
In the previous article we mentioned a list of all the materials you need to make a Quiet Book. In this post we will show you how to make your own Quiet Book in 10 steps.
Read through the steps carefully before you get started.
Choosing the right template and design
Before you choose a template or pattern, think about the activities and topics your child is interested in at their current stage of development.
Make sure that the activities you want to encourage with your Quiet Book are age-appropriate. If your child feels overwhelmed or doesn't understand certain activities, he or she will quickly lose interest in the Quiet Book. Conversely, it may also be that they feel underchallenged and even then they will have little interest in the book.
Collect ideas on Pinterest
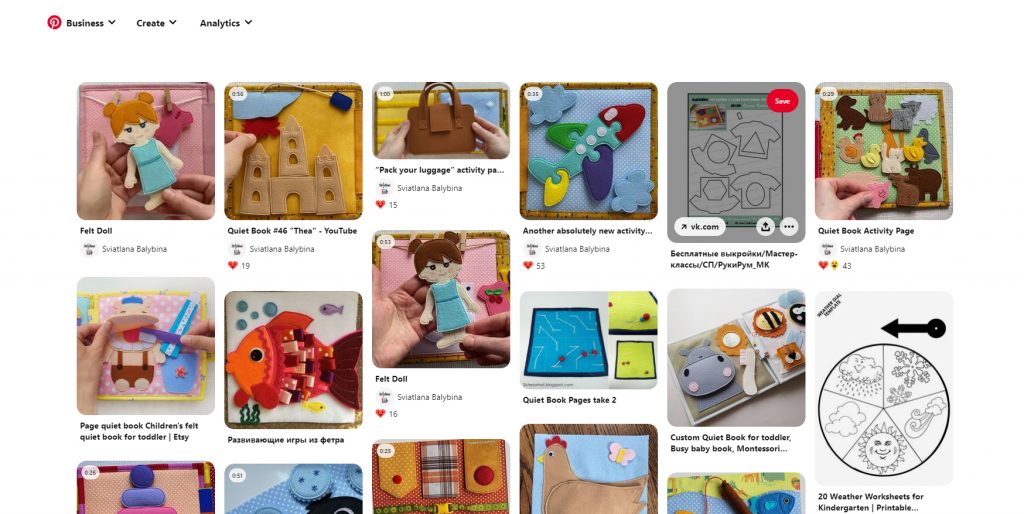
Pinterest is a treasure trove of ideas for creating a Quiet Book. The best thing to do is to create a folder to record the creative ideas that appeal to you most. This way you don't lose track and you have all your pins in one place.
Do you have enough ideas? Then it’s time for the design. Write down everything that is relevant to your Quiet Book on a piece of paper or in a Word file. Don't forget the front and back design and write down the order of each page.
Make the front page attractive and colorful. If you choose a favorite motif of your child, for example their favorite animal, a rainbow, a car in their favorite color or a fairy with glittery wings, they will be even more interested in the Quiet Book.
Ready-made instructions or would you rather have your own pattern?

Once you've collected all your ideas and created a first draft for your Quiet Book, you can either make your own pattern or buy a ready-made pattern on a platform like Etsy. There you will find a whole range of shops that offer themed patterns with detailed details for sewing yourself.
If you already have specific ideas for your Quiet Book or don't want to spend money on the patterns, I recommend that you first make a draft on paper. You can then scan it and then use vector graphics software on your computer. A free tool that I can recommend is Inkscape, a 2D CAD program. This allows you to trace and adjust curves and lines, adjust the size and optimize it.
Complete? Then you can now convert the individual patterns into pages.
Calculate the material requirements for your Quiet Book

Select the cotton fabrics you want to use for each page. I recommend using a more subtle color or a neutral background. This means your child can concentrate on the individual activities and is not distracted too much.
To make a Quiet Book with six activity pages visually appealing, you'll need about 10 different colors of felt.
Calculate in advance how much fabric and material you need. This will give you a good overview of the costs and allow you to make adjustments if necessary. At the same time, you save yourself costly repeat orders or another time-consuming visit to the craft store.
Purchasing the materials
The next step is to gather all the materials needed to make your Quiet Book. In our blog post “ The right materials for making your Quiet Book – our best tips ” you will find a complete list of the materials you need.
Depending on your design or the pattern you purchased, you can now purchase all the fabrics and haberdashery you need for your Quiet Book.
The effort involved in producing a Quiet Book is enormous. Don't forget to also get fleece and the various inserts, as they will give your book the necessary strength. After all, you want your child to be able to play with their Quiet Book for a long time and then pass it on to younger siblings or children in their circle of relatives and friends.
You may first have to invest in a cutter, rotary cutter and cutting mat. The purchase is worth it, not only for making additional Quiet Books, but also for numerous sewing and craft projects.
Is everything complete or is something still missing? Once you have everything together, sewing will be quicker.
Iron-on fleece and inserts to reinforce the individual pages
To give the individual pages of your Quiet Book enough stability, use iron-on inserts that are available in different thicknesses. They are placed on the wrong side of the fabric to be reinforced and then ironed at the appropriate temperature. In the handicraft shop you can buy iron-on fleece from a roll, sometimes already cut to size.
First cut the iron-on fleece in the format you have chosen for your Quiet Book. Then you cut the fabric, but slightly larger than the iron-on fleece, at least 1 cm more on each side.
Next, the fabric to be reinforced must be carefully ironed so that it is free of wrinkles. Completed? Now turn off the steam function of your iron. Then place the iron-on fleece with the shiny side down on the left side of the fabric, i.e. on the side that will not be visible later.
After all sides have been reinforced with iron-on interfacing, you can now cut off the excess fabric around the interfacing to get the correct size for each side.
Preparing the individual applications
Now we can continue with the design of the individual activity pages. This step is time consuming because many small pieces have to be cut out.
I recommend that you plan enough time and peace for this and cut out the respective applications page by page. Only when all parts are complete do you move on to the next page, so you don't lose track.
So that nothing gets mixed up, it makes sense to label each part on the back with the page number. You can then store the cut out applications in a small paper bag until you sew them on, one for each side, so everything stays organized and nothing gets lost.
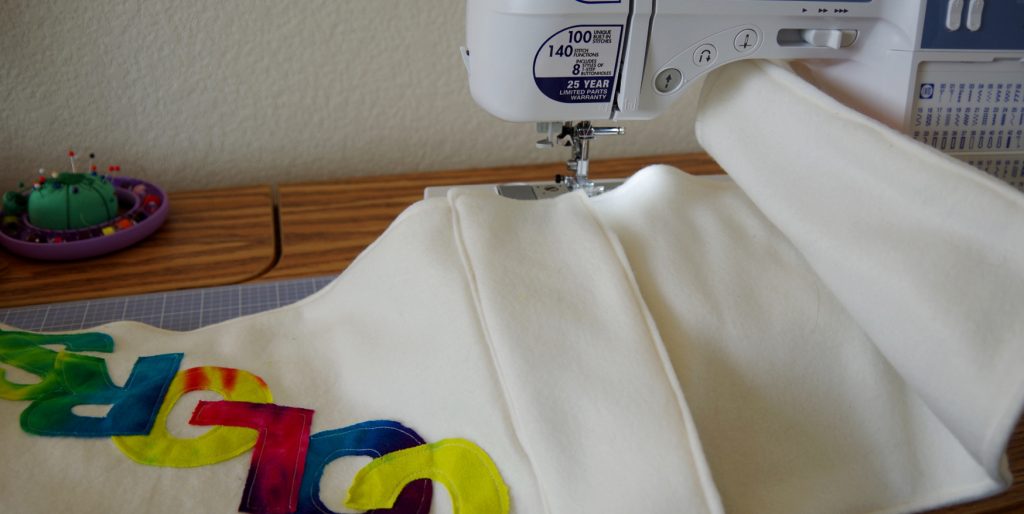
Designing the individual pages
Now it's time to sew on the individual applications. This is quite a demanding step. Pin the individual pieces or tack them with a few stitches so that nothing can slip while sewing. The longer the stitches, the less resilient the seams are. That's why it's important to work with a small stitch length; after all, your Quiet Book should withstand extensive play. Sew at the slowest possible pace so that the stitches remain clean and regular, even in tight curves. Complete? Remove any pins and any basting threads.
Sew the individual pages together
After all the activity pages are finished, stiffen the pages again by placing a layer of polyester batting between two squares of fabric.
Carefully pin the sides together – two each, left sides together and with a layer of polyester batting in between. Then sew about 0.5 cm with backstitch along the four edges. Remove the pins.
Mark the edge that will later disappear into the inside seam. For a clean finish, the two sides are now bound with bias tape along the top and bottom edges and on the outer edge so that nothing can fray.
The final step – putting pages and cover together
Finally we come to the final step, which is to put the pages and cover of the Quiet Book together.
The activity pages are placed on top of each other in the correct order and stitched on the side that does not have bias binding. It is helpful if you have stapled the pages together by hand beforehand so that nothing can slip.
Finally, the cover and back of the fabric book are placed on the pages that have already been connected to each other and also stitched on the edge. To ensure that nothing frays, the edge is edged with a piece of cotton fabric or wider bias tape.
Your Quiet Book is ready!
